
For all reception based issues, please Click Here to open for a Digital TV Reception Troubleshooting guide, written by DBA (Digital Broadcasting Australia). You must be connected to the internet for this page to load.
The table below provides basic troubleshooting ideas, which may help you with your problem. If your problem is not resolved, please contact us via e-mail
| No channels scanned | 1. Check that your antenna is connected
to the ANT IN socket of your DNTV Live! PCI Card.
2. Check that your antenna is working properly, and any signal boosters/power supplies are turned ON. 3. Check that Digital TV is being broadcasted in your area. Click Here to visit the DBA's Reception Locator. 4. You have selected ' Scan All Frequencies ' in the Tuner Scan settings. 5. Your antenna is compatible with Digital TV. Some antennas are not equipped to receive Digital TV signals, please read the Digital TV Reception Troubleshooting Guide |
| No Video | 1) Make sure you are using the latest
drivers for your video card. Visit your card manufacturers website for
details on how to do this.
2. No other applications are open that are displaying video. The 'Overlay' may be used by another program preventing DNTV Live! to display the video, please close that application. 3. Make sure the channel you have selected contains video, it may be a Radio channel. 4. Change the Video Decoder. Your system may not have that particular decoder installed or your computer isn't compatible with that particular decoder. |
| No Audio | 1) Your speakers are
connected properly and the cable is inserted into the correct plug.
Please check your Sound Card's manual if you are not sure.
2. Check that your speakers are not muted and are switched on. 3. Check the Windows Volume Control, by double clicking on the speaker icon in your system tray. The audio may be muted or tuned down to low.
4. Change the Audio Decoder. Your system may not have that particular decoder installed or your computer isn't compatible with that particular decoder. |
| Stuttering | 1. Your computer meets the minimum system requirements for
DNTV Live!
2. Move the DVB-t card to a different PCI slot. PCI slot 3 is recommended, however as different motherboards handle PCI slots differently, its hard to say which slot will work well for you. Try each slot, you may have to move other installed cards around. 3. DXVA is enabled in the Video Decoder Settings 4. Change the Application Priority to 'High' (using the Windows Task Manager). 5. Change your monitor's refresh rate to a multiple of 25. 50hz, 75hz or 100hz. To enable 50hz you need to use PowerStrip 6. You have a good clean signal. Generally Signal Quality must be above 70% and Strength above 65%, these are an absolute minimum. Reception may be achieved with lowers stats however choppy audio and glitchy video may occur. 7. Disable TimeShifting. This will reduce the load on your computer, and may help reduce stuttering. |
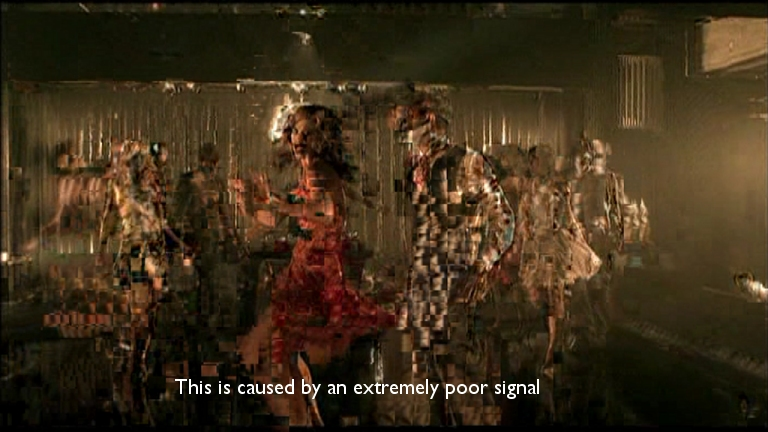
| Picture Errors | If you are seeing something similar to the example below or can notice strange picture artefacts, please ensure you have a decent antenna using Quad Shielded cabling. Glitches in the picture are caused by poor antenna setup and/or DTV broadcasts being poor in your area . Please Click Here to read the Reception Trouble-shooter. |
If you have found a bug or need help with the software, please email support@digitalnow.com.au and describe your problem.
Digital Now wishes to thank Jeremy Barr and Kenneth Webb for their assistance in putting together this Manual